
In case you missed it…
I started a new YouTube channel for the Ruth Lee Diary!
You can check out my first video HERE!
In this blog post, I am going to go a little more into detail on this video!
And if you’re ready to get your FREE Mieoko Kabuki Brush (A $24 value! Just pay shipping!) Click HERE!
Step One: Fresh Face
It makes sense, right? You want to have the best possible canvas for your make-up. There is no sense in spending money on quality make-up products, if you abuse your skin! This year, one of my goals was to really focus on baby-ing my skin.
I really recommend the brand OleHenriksen for skin products! If you’re not sure where to start, look into the Three Little Wonders set here.
It includes:
– 1 oz/ 30 mL Truth Serum
– 1 oz/ 30 mL Sheer Transformation Perfecting Moisturizer
– 1 oz/ 30 mL Invigorating Night Transformation Gel
Together, I noticed a HUGE difference in my skin’s brightness, firmness, and smoothness! I also adore the Power Peel system from OleHenriksen if you are looking for an at-home facial with impressive results!
And, the obvious but often forgotten: don’t sleep in your make-up.
Listen, I hear you. I used to be, unfortunately, notorious at breaking this rule. I try and keep a pack of facial wipes near my nightstand in case of emergencies! In worst case scenarios, this is by far better than nothing!
OK, now that we have the basics down, let’s continue!

Step Two: Foundation
In this particular video, I am using Laura Mercier Flawless Fusion Ultra-Longwear Foundation.
TIP: If you notice, the color is quite a bit different than my face’s skin color in the video. That is because… I spray tan. When you spray tan, your face is often the first place that your tan fades from! I like to keep several shades on hand, because honestly, I never know what color is going to match best! This shade is really tan, but it best matched my freshly-sprayed body. And even for people who naturally get more tan in the Summer, your foundation shade will change!
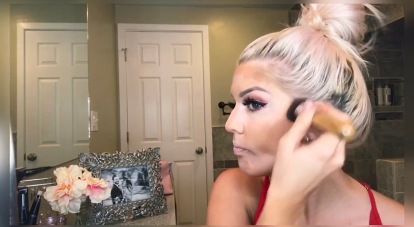
As I say in the video, I like to apply the foundation on my face in five spots- on my forehead, on my chin, on each cheek, and on my nose. A little goes a long way; especially if you have a quality foundation AND foundation brush. I always like to find cheaper make-up products when I can, however, foundation is one that I think is OK to splurge on.
Make-up brushes- now those can get expensive! In my personal collection, I have a varying degree of costs for my brushes! If you’ve looked, then you know. It can get ridiculous! So, I am here to ease the burden of the insanity!
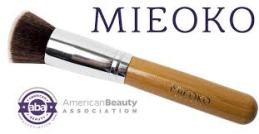
I saw an ad for a Free Kabuki brush (just pay shipping) and I figured it was worth a shot! I paid a few dollars, and to my great surprise, I received my brush a couple of days later!
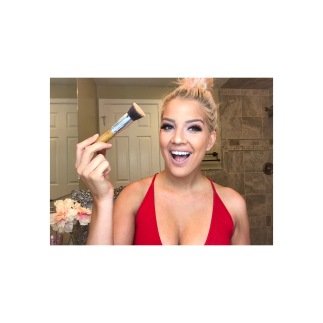
It’s called the Mieoko Kabuki Brush, and at the time I am writing this blog, you can get yours for FREE as well, click here!!
I am not sure how long this will go on, so I would probably recommend doing this sooner than later!
Anyways, I was really surprised by the quality of this brush. It is a flat-top brush with really high density bristles. This is perfect for medium to heavy coverage- and with the right application, you will get really pretty, flawless and EVEN coverage!
In the video you will be able to see how I “buff” the foundation- these means using really precise and circular motions of the brush to blend the foundation into my skin.
Step Three: Cream Contour
For the past few months, I have been falling in love with the Graftobian HD Glamour Creme Super Palette in Cool. This has a pretty hefty price tag, but for good reason. I have yet to encounter another creme palette that has such an incredible combination of blendability and pigmentation. If you are a MUA, you need this! I actually found out they use this exact palette on TV and Movie sets, and I can see why. If you can’t fork out the money for the whole palette, they also have smaller palettes on their website! Again, I really love to find drugstore products, but if you are looking for a quality and lasting product for your make-up kit, here you go!
In the video, I showed you where I put my light shades for the contour (I use the lightest shade in my kit, buff)- Under my eyes, on my forehead, on my chin, the bridge of my nose, and a little on my upper lip.
To apply this particular formula, I prefer to use my fingers. It is just really precise, and the warmth of your fingertips will allow a really smooth transition from palette to face. Then, I blend it with the Mieoko Kabuki Brush. (I love this brush for blending my contour!)
For the dark shades, I use a combination of Butterscotch and Auburn. I apply this on the outside of my forehead, my cheek bones, on each side of the bridge of my nose, and a little to accent my chin.
LOCK that contour in with some of favorite magic powder- Laura Mercier Translucent Setting Powder. You can’t go wrong with this stuff, folks! It leaves your skin matte and perfected. By the way, this formula is flashback free, which means your selfies will not suffer!

Step Four: DRAMA
To amp up the contour, and also assist in a more seamless look, I have a few tips. I apply bronzer as you normally would- accenting the places on your face where the sun would naturally shine on you. Your cheeks, nose, forehead. I use Urban Decay’s Beached Bronzer. This is a really nice shade, and doesn’t have any glitter or shine to it.
I also like to touch up with a little powder contour. Que one of my favorite drugstore products- e.l.f. contour palette. I love this because we are just accenting the creme contour, so you really don’t need to over-do it with an expensive powder palette. This one works beautifully for me! Just lightly go over the dark contour that you did previously with the creme palette!

Step Five: HIGHLIGHT, YASSSS!
I can’t even begin to express how the act of highlighting my face has genuinely changed my life. For real! I go from tired, flat, yaaaawn momma to unicorn-fairy-princess momma!
The beauty of highlight is that you are allowed to go as natural or as YAS-QUEEN as you want! So, don’t be afraid!
I show you my love of Marc Jacob’s Coconut Dew Drops Gel Highlight in my video. I have also swatched this on my Instagram if you need to see how dreamy it is! You can achieve the most natural of glows with this product, or build it up for more glow! It is a breeze to blend! Oh, and yes, it smells like heavenly coconut. Need I say more?
Also, where you choose to highlight is totally up to you! The tops of your cheeks are pretty key! I also like to dust the bridge of my nose, a little on my forehead, and again, a little on my upper lip!
OK and real talk, if I was left on a deserted island and had only one make-up item with me, I would choose Diorskin Nude Air Luminizing Powder.
I am 100% in love with this product. I can’t express how passionately I feel about this. It is the epitome of perfection. If words like: radiant, luminous, iridescent, and glowing are how you want to describe your face- BUY THIS. NOW. I top off my highlight with this and that’s it. There’s nothing else you could add to your face to top this. You’re done!
This is definitely not my “every-day” face routine, but if you want a really pretty, glowy, and contoured look for the Summer- this is it.
If you pretties have any questions, ASK ME!
Thank you so much for supporting me and my blog and NOW my YouTube Channel! ❤
xoxox,
Ruth Lee


your ridiculously beautiful face showed up in my word press reader and I was like ” whatever she has to say, i’m listening” lol
LikeLike
haha actually ı dont like make up but you really know that work 🙂
LikeLike
Hi, Great makeup for a subtle more natural look. Thanks for sharing.
LikeLike
Great article. I think I need some lessons from you, as my makeup never ends up looking that great. Awesome brush too xxx
LikeLike
The result looks amazing!
LikeLike
absolutely gorgeous! love this glow!
LikeLike
Looks really awesome! Thanks for sharing 🙂
LikeLike
Oh, I need to try the Marc Jacobs drops, too!
LikeLike
That brush looks like a steal, I have oily skin and I live in Florida so it’s a bottle to keep the glow from looking greasy after a few hours, will order a brush…
Cheers to your success,
Maggie
Cascadeavenue.com
LikeLike
Awesome!! Thank you for the tips!
LikeLike
Gorgeous! I’ve been trying to take better care of my skin. I need to try this moisturizer.
LikeLike
Beautiful! Thank you for sharing. Looking forward to exploring some of the products listed. Being Confident in one’s skin is such a good feeling. http://www.paparazziaccessories.com/85483
LikeLike
I love it! What a gorgeous glow it gives you! I’m checking out your YouTube channel next!
LikeLike